Pages

Wednesday, January 29, 2020

Bright Orange, with Silver Butterflies

Welcome

For this new challenge at Word Art Wednesday we are being sponsored by Stamps of Life, who are generously providing a $25 voucher for the winner.

I love the way this card came together, and although the camera has portrayed the colour as a darker toned orange, it is actually a vibrant, bright orange!


I cut the printed verse (Ps 40:5)  using a S/B lacy rectangle die, embossing and sponging orange ink around the border before removing it from the die


 The orange card in the background was embossed with a very old Cuttlebug folder called Swiss Dots - it is still a favourite

The butterflies were cut from silver sparkle card, attached to the card over some gauze, with a clear rectangular rhinestone added to the middle of the body
I layered a strip of silver florist 'mesh' behind the feature panel also.


The inside was finished with some sponging of orange ink on the writing panel


I am linking this to:


Monday, January 27, 2020

Nine Patch on Paper

Welcome

I  this card was inspired by one made by a fellow Kiwi,  Glennis at Creating Cards.
I also watched the You tube video she was inspired by, presented by another Kiwi ,Natasha Foote

This is my card as a result of the inspiration!


The background 'blobs' were painted with Lindsay's powders using Cabana Coral and Whale Watch Blue.  As I had a recipient in mind for the card I used the centre blob for the sentiment, which was embossed and cut out using the smallest S/B Magnificent Rectangle Die


The individual spots I stamped (using masking to protect the other areas), with flowers in black on the blue, and foliage in bottle green on the coral.


The stamps were some grasses by Hero Arts, and Kiwi Stamping, the flowers were by Stampin' Up (Oh so Lovely, my first set of SU stamps) and Kiwi Stamping. 


I decorated the inside with some washi tape, and one of the Stampin' Up images stamped three times to gain some height and added interest, in London Fog ink. 

I am linking this to:
(The sentiment)


Saturday, January 25, 2020

Promise Box Bits aka Have a Laugh at Me.

Welcome

Sorry I have been Missing in Action - it's mid-summer here and I have been doing some much needed work in the gardens in the mornings, before it gets too hot, and then making cards in the afternoon in my air conditioned studio.
I have completed a dozen or more cards, and still have one to make for this month.


I was lacking in inspiration when I went to make this card, so rummaged through my my die cut  'promise box'  (I promise I will use these one day) 
and decided that this was the day I could use these bits and bobs that played nicely together.


The butterflies were cut from some card randomly painted with gold and emerald green Inka Gold paints.  The die is the Pippi butterfly die from Memory Box, this appears to have been discontinued, but this one is very similar


The white layer was one I had embossed when received some unidentified dies - I initially didn't like it as I inadvertently used some light weight textured card, but it fitted with this card, and added some lovely texture.  One corner had fallen off, so hence the two rounded corners!

The ribbon is a woven rayon, and did not want to cooperate, so I glued the knot with some glossy accents, and hid the resulting umm,err, blob, with the wing of one of the butterflies.


The die cut sentiment is another, older, Memory Box one, and the soft blue green of the card fitted nicely with the emerald green of the butterflies.

I mounted the finished panel onto the pale gold card, and then discovered I had glued it on the wrong way round, so the card opened from the top... so it got trimmed in half, and I remounted it onto the dark green base, which really framed it out beautifully!  A happy mistake.

I did take a photo of the inside with a piece of floral washi tape on it, but the photo was fuzzy :(.  Something I cannot correct as the card is at it's intended destination.

I am linking this to:
(The butterfly is an old favourite)


Thursday, January 16, 2020

Pink, Grey and Rhinestones

Welcome

Here in New Zealand we are in summer, and that also means that the country pretty much is on a massive 'go slow'  from Christmas Eve until late January, as it is the main holiday season. 
Which explains why I am a day late with this (I lost track of the date as there is nothing "happening". ..all my usual groups that I participate in don't usually meet in January).  
It is also part of the reason I am still working on the borrowed computer as the business providing it for me is 'on holiday'!  

This fortnight's Word Art Wednesday Challenge  is being sponsored by Neat and Tangled, who are providing a $15 voucher to their store for the prize.


I started this with a piece of patterned paper that took my eye - it was sitting on my desk, and now I cannot find which pad it came from - oops.
The cardstock was from my stash (purchased from a local printer) and matched the pink in the paper.


The scripture is from Lamentations 3:25, and after printing I cut it with a M/B stitched rectangle die (This appears to be discontinued)


I embellished the card with clear rhinestones to the side of the scripture panel


and on one end of the chiffon ribbon.  The ribbon was too wide, so I folded it in half to use it, and also to make it show against the dark paper. 

I did sponge the inside writing panel with pink ink around the edges, but it does not show in the photo :(,so I left that photo..

I am linking this to:
I used one of my favourite dies, the M/B Rectangle
(Memory Box rectangle)


Tuesday, January 14, 2020

Glitter 'n' Sparkle

Welcome

I would like to extend a very warm welcome to Corry  - do pop over to her blog and have a look at her wonderful work.

I had meant to post before now, but this borrowed computer and I have been having BIG arguments about downloading photos from my camera, and then trying to transfer them to my flash drive...
 but I've won, this round at least!!


I made this for a dear family member who loves her garden, so my starting point was this fabulous floral image that I had stamped off when visiting a friend, and coloured with Polychomo pencils, some time ago.


I trimmed the image by hand, and then mounted it over the S/B majestic Squares die cut.  
Although the photo does justice to the sparkle card, the colour of the pencils has been drained , as the orange flowers and the copper card are a good match.


I added a sentiment embossed in copper on to some blue card, the same colour as the base cardstock, and layered it onto some lace that the recipient had given me years ago, and then onto the yellow checked paper.


I finished the inside with a strip of sparkly copper (Scotch) tape :)

I am linking this to:


Thursday, January 9, 2020

Look Ma - No Stamps!

Welcome

This card started as a background  that I made from Brushos while experimenting with their SprinkleITs  - this one used an iridescent one. 

The friend I made the card for is a keen gardener and amateur florist, so I chose a botanical theme


I was able to find some card that matched the brusho colours, as did the chiffon ribbon.


The wee floral images were from a Kaisercraft 6x6 pad called Rose Avenue 


You can see some of the subtle glimmer in this photo - it is notoriously difficult to photograph.


The greeting is from the same pad - I edged them all with Memento Rhubarb ink


I used another  of the pop outs from the same pad for the inside sentiment

I am linking this to:
This was made for a very dear friend


Wednesday, January 1, 2020

Happy New Year With a Rose

Welcome

Happy New Year, and may you have a marvelous year this year!!

The first challenge this year at Word Art Wednesday is today - a wonderful start to 2020.

Our sponsor is the fabulous Stamp Simply , and they are offering as a prize either two stamp sets, or a stamp set and matching dies.  BTW, they have an amazing sale on at the moment. 


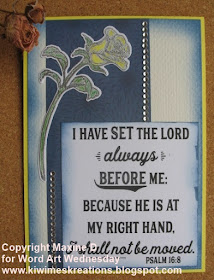
I went to get my Simply Stamped Roses stamp set out, and discovered I had this coloured and die cut image already in the packet, so that was my starting point.


I reached for blue for the contrast colour on the front of the card - the edges were all sponged with Faded Jeans DI, the strip of PP is from the  Kaiser Craft Starburst paper pad.


The image was silver embossed and coloured with Prismacolor pencils.  The base paper is a textured pale cream coloured paper that adds some more subtle interest.  This was all mounted over some Canary cardstock.


I stamped the inside with the image in the Faded Jean DI, and lightly coloured it to match the outside image.  The liner was also edged with the blue ink. 

I am linking this to: