Pages

Tuesday, March 8, 2022

Be-Jewelled Flowers

Welcome

I am currently blogging cards I made earlier in the year as I am still not at home - but that's fine, I can still make cards, I am just not sure of the quality of my photos of them, as I have taken them on my phone - I will have to get brave and upload them to the computer and find out 😉


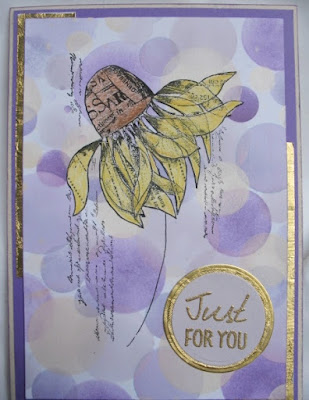
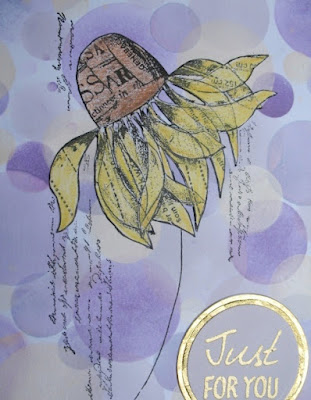
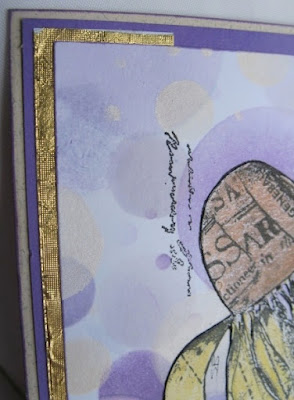
This card  started with a panel that I had made last year using brushos and lots of water, then taking prints off the original - I think this was a second 'print' and was a very soft colour, which I then sprayed with a Lindy's mica spray - sorry, I can't recall the name of it. 
The spray did blotch in places, but it looked ok so I continued... 


I found some die cuts that my friend CarolG gave me about four years ago.. I lined them up to curve down the left of the card, and added some clear rhinestones to the flower centres


The sentiment was white embossed on the same dark green card that I placed behind the focal panel, and I added a tiny strip of the water colour panel there too

Then I really went to town and added more rhinestones over the card front - I don't think I have ever used so many on a card - but it worked!! 😀


The inside also had a wider strip of the background  paper added to finish it.

I am linking this to:


Saturday, March 5, 2022

Smile!!


Welcome.

This card is CASE of one by the very talented  A. Rose of Sundaystamper Papercrafts   There were lots of changes, but if you pop over to her blog here,  you will see the inspiration...


Instead of patterned paper directly on the base, when I found this gorgeous, textured but very soft paper in my stash, I wrapped it around another layer of card. 


I then came across this negative die cut of sparkle card, (it was a snippet in the packet of dies) and made that my centre piece, mounting it on foam to add dimension.


I then embossed the rest of the greeting in white on a snippet of cranberry card, and placed it below,
 not across ,the 'smile'  die cut.


I found the feather on my studio floor, complements of my cat I suspect, so tucked it under the main panel to soften and balance the card.


The inside was very simply decorated with some washi tape:

I am linking this to:


Wednesday, March 2, 2022

CAS and Scripture

Welcome

Today is the start of a new challenge over at Word Art Wednesday, and our wonderful sponsor is 
Taylored Expressions, who are giving an awesome $30 gift voucher to the winner!!

I started this card with some pale green cardstock, and part of a sheet from a calendar page.  The calendar is  published  by a local (New Zealand) craft firm, and each month's page can be torn off, and used for papercrafts.  It's fabulous quality paper, and I love using them.


I printed the scripture panel, designed by Karen M and available free on the Word Art Wednesday Challenge page, die cut it, and brushed on ink before removing the die. 


This was mounted, partially offset, over a tan panel that I had layered some gold ribbon around.


I finished the inside with a snippet of the design paper used on the outside.

I am liking this to:


Friday, February 25, 2022

A Pink Peony

Welcome

I would like to extend a welcome to my newest follower, Barb Finnical of 
Stamping For Beginners and Beyond.  Do pop over and visit, she has some wonderful work on display

Today's card features the Gina K  Majestic Peony stamp, Stamped in Memento London Fog ink and coloured with Polychromo pencils.


I trimmed the image out, coloured the area at the rear that I did not trim, and attached it to the back of  a standard fold card that opens from the left...  I tried the technique here as taught by Jennifer McGuire - Don't know that I did it quite right, but it 'worked' 


Here it is partially opened.

The base of the card was painted with some Cosmic Shimmer mousse in  metallic blue.  I cannot give your the exact colour as I am currently not at home... I am staying with a friend who had surgery this week.  


I embossed the sentiment in silver onto the blue, and also added some silver sequins around the focal image, some of which are on the panel, and some on the blue background


The inside is a double spread that I layered over the base for added stability - I also stamped part of the image in the grey, splitting it over the two sides.  The panels were edged with the blue, and an encouraging verse stamped in the grey on the left.

I am linking this to:


Sunday, February 20, 2022

Stacked Iris Sympathy

Welcome

I was asked to make a sympathy card for a group that I belong to after the news came through that a well respected ex-member had passed away.  It needed to be larger than my normal size so lots of folk could sign and put their own messages in.
I had got to know this lady and greatly admired her for her needlework, her strength of character, and her compassion.  She also loved irises, and grew a lot, as well as on occasion embroidered them, hence why I chose them to feature on this card. 


I found the basic image online here.  It is a wonderful resource for floral images!!

I sized it in three sizes, and also flipped one image for some more interest, coloured them with my Polychromo pencils before fussy cutting them and organising as I wanted them, repeatedly!


Before I assembled the card, I used a gold pen to do some faux stitching around the border, masked that off, and stamped  a lovely pincushion image in Versamark ink.  The sentiment is gold embossed on torn vellum,


The irises were stacked to one side of the sheet of design paper from the Recollections Rainbow Inks pad.  I trimmed it so the pattern was only on one side, and also embossed it using my very old Swiss Dots folder.   I layered some gauze under the irises, but this does not show up in the photos.


The inside has four pages for folk to sign, and I also finished them with gold faux stitching, and after attaching them, tied a narrow piece of gold ribbon around the whole card, with the bow on the outside.

I am linking this to:

(Opt, Add a Sentiment)


Friday, February 18, 2022

A Flower Against Bokeh

Welcome once again
Thank you for taking the time to visit.

In my small, New Zealand swap group we were challenged to use the bokeh technique on our cards this month - not a technique I had used before.


The inks I used for the background of the card are from the Altenew Shades of Purple pack, I used the Deep Iris, Lavender Fields and Soft Lilac, and the white is Memento Moonlight White.


The flower is from Crafty individuals and simply entitled Flower! I stamped it on the background, then on another piece of white card and coloured it using various Polychromo coloured pencils, fussy cut it and glued it over the image on the card base.
The greeting is a magazine freebie, gold embossed.


The gold layering is chocolate wrapper over card, then trimmed to fit where I wanted the pieces.
The chocolates come wrapped in gold in a wee brown 'cup'.  I was making the most of the gift :)


The inside was finished with a thin strip of gold washi

I am linking this to:
(The gold paper is really bright and blingy)


Thursday, February 17, 2022

Tulips, Rhinestones and Scripture

Welcome

It's time for another challenge over at Word Art Wednesday where we are being sponsored by the very generous Stamp Simply Clear Stamps with a wonderful prize of their product.


The beautiful scripture was crafted by Karen W and is available free, over at Word Art Wednesday


I used the Stamp Simply Get Well Tulip to feature on this card, colouring it with Faber Castell polychromo pencils, and then fussy cut before mounting over a piece of Cranberry card..


The feature panels were mounted onto a soft, buff coloured card over which was layered some pale green patterned paper from the Kaisercraft Rose Avenue pad. 
Some light green rhinestones finished the card

I finished the inside with a strip of green patterned washi tape, but forgot to photograph it! 😒

I am linking this to: