Pages

Tuesday, December 28, 2021

A Christmas Card - at last

Welcome

A special welcome to Jawad, my newest follower. 

As intended yesterday, here is my Christmas card for this year... 


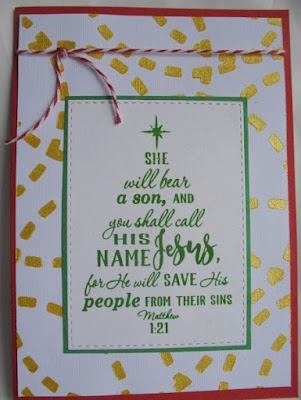
I kept to a traditional colour scheme of red green and gold,
and featured the wonderful tree stamp from the Sweet 'n' Sassy O Holy Night set. stamped onto some white snippets, and die cut, then layered over a green snippet, trimmer to give just a small border.


The background was created by mixing iridescent paste with Brutus Monroe Phonebook ink spray, and using the ARTplorations Confetti Circles stencil


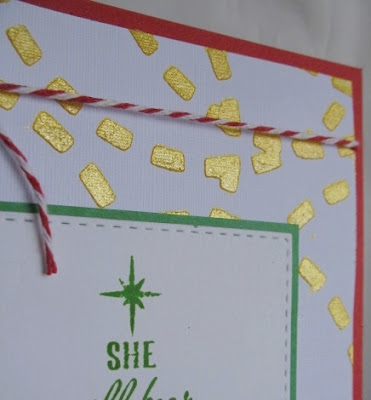
A wee piece of red bakers twine featured across the top - in some cases I used a piece of gold lame ribbon when the stencilling had not quite gone right ...
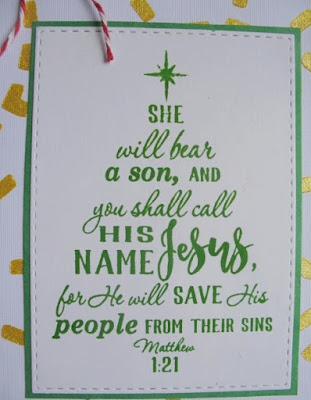
Monday, December 27, 2021

Times three

Welcome

This was going to be the post that I shared my Christmas card on, only I discovered I had not taken a photo of it - oops, thankfully I still have a 'spare' that I can take a photo of.

This card was made as a swap for a wee New Zealand group I am in, and the theme set for December was "three"  Very flexible, the idea being that we use groups of three on the card


The layered peony had three layers to the stamping, and was coated with Wink of Stella,
and three leaves.


The card had three techniques - embossing, die cutting,  and paint splattering
and three mediums - paint, card and cheesecloth


The sentiment had three words


There were six rhinestones (2x3) and there were three panels in the design
There were also three colours - red, gold and black.


This inside was finished with a simple stamp of the outline layer of the flower.

I am linking this to:

the flower was die cut


Wednesday, December 22, 2021

A Stencil, String and Shimmer

Welcome

I thought life was going to slow down a bit - well, thought thought wrong!!  Maybe next week.
Once again it is time for a new Word Art Wednesday challenge, and our sponsor for this challenge is Sunny Studio Stamps, with a generous $25 voucher to their store.

This weeks card came together very quickly


I started with this monoprint from an ARTploration Confetti Circles stencil that I had used brown ink on, and then moistened it with a spray of red Perfect Pearls 


The verse was beautifully crafted by the talented Karen M, and is available free on the Word Art Wednesday blog.  I cut it out with a stitched rectangle die, and lightly brushed  the edges with some Memento Lady Bug ink before removing the die


I tied some twine around the focal panel before mounting it on some deep red/brown card


The inside was finished with a strip of the card I used for the front.

I am linking this to:


Thursday, December 16, 2021

A Stencil, Bird and Beads...

Welcome
Life seems to be going at double speed at the moment!! Not only do we have all the Christmas preparations, but there are also end-of-year functions too.  
Here in New Zealand the country all but 'stops' from Christmas Eve until the end of January as folk take their summer breaks....
I was also asked to make a set of five cards, which I cannot share until next year.
Add in an adverse reaction to medications and babysitting, and life has been full!

I made this a wee while ago, but had not blogged it


The background is made using the Bold Florals ARTplorations stencil from STAMPlorations, 
I used the Memento ink, Tangelo, darkening the towards the centres.  The leaves were coloured in Bamboo Leaves, again shading as I went
The branch was a die cut from kraft card, with an unmarked die.  The bird was coloured with Espresso ink, which was also used to stamp the greetings


This main panel was layered over orange then green card.


I had this sitting for several days, not really satisfied, until I thought of adding the micro beads to the flower centres.


The inside was decorated with strips of the base card

I am linking this to:


Wednesday, December 8, 2021

Christmas with Sparkle

Welcome

Today starts another challenge over at Word Art Wednesday, with another beautiful scripture available free over there.  
Our sponsor for this challenge is Crafty Individuals with a 25 pound voucher to their store.


I started this card with the idea of silver on blue, and then found my Iridescent Silver embossing powder...  which made it hard to photograph... 


I printed the beautifully crafted verse, trimmed it and embossed the edges


The image from Sweet n Sassy stamps  O Holy Night set was perfect, and embossed well
In the above photo you can see some of the glitter. 


I sprinkled the embossing powder on the background and heated from underneath, and it gave the impression of twinkling, sparkly stars in the night sky.


The inside was stamped with another sentiment from the same set,  in Concord & 9th Midnight  dark blue ink, which I had also used on the edges of the insert.

I am linking this to:


Saturday, December 4, 2021

Roses for Encouragement

Welcome

I made this card for a friend who has been in hospital for quite some time - far longer than she would like, I am sure, and I know she would be missing her roses, of which she has many!


I started by stamping the image, from Rose Thinking of You set by Stamp Simply,  three times, with London Fog ink and colouring it with  Polychromo pencils before die cutting it


The three rose stems were laid over each other to form a curve, and added to some silver patterned paper, leaving some of the leaves over the edge.


The blank edge of the yellow layer was embossed with an edge EF 
(make unknown, possibly a magazine freebie) 


The sentiment was not the one from the set, but one I have owned for a long time.  
I stamped it on a slightly darker yellow card snippet in Cottage Ivy ink.  
I had first put some Versamark ink on the stamp, then the die ink so it was slightly sticky, then I sprinkled over some Kiwi Perfect Pearls to give a little shimmer to the words. 
I would normally have heat embossed the sentiment, but we had a day long power cut that day, so I had to 'think laterally'. 
 After trimming the panel and rounding the corners, the panel was mounted on foam dots over the background


Some washi tape finished the inside - this was in rose gold, but it shows tan... 

I am linking this to:


Tuesday, November 30, 2021

An Easel card, Plus

Welcome

This is a card I made for my local swap group for November.  The challenge was to make an interactive card that had an element that moved, popped or generally was not just 'flat'.

This is how my card would have looked when the recipient took it out of the envelope


Once it was opened and set for viewing, it would have looked like this


I used a plain green card base, with papers from a Recollections Pad named Rainbow Inks.
The flowers were made from white card, coloured with Cosmic Shimmer Summer Sky Opal Polish, and then sprayed with blue mica sprays - the leaves were from the base card with green mica spray added before die cutting.  
All the dies were older S/B dies, including the base of the focal panel


The wee panels on the side  after being assembled were were adhered using foam tape.
The flower centers are coloured brads that I have had for a v-e-r-y long time...


Here the sprays show on the die cuts


This is how the card looks in profile once 'stood up', and you can just see the mechanism used to pop the focal panel.

I am linking this to:


Sunday, November 28, 2021

Faded Cogs

Welcome

This is a card that I taught last month using a stencil technique.


To start the sentiment area is masked and then the stencil placed and inked working from the masking out, fading out the further you go from the masked area, but not covering the card front completely.
I chose to 'mirror image' the stencil by flipping it over between the top and bottom of the masked area.


The sentiment was copper embossed, using a magazine freebie stamp


When mounting the stencilled panel, I added a wee snippet of copper paper in the top left and bottom right before adhering to the base - subtle, but a touch more of colour and texture.


I finished the inside with a strip of copper spotted washi tape.

I am linking this to: