Pages

Friday, February 25, 2022

A Pink Peony

Welcome

I would like to extend a welcome to my newest follower, Barb Finnical of 
Stamping For Beginners and Beyond.  Do pop over and visit, she has some wonderful work on display

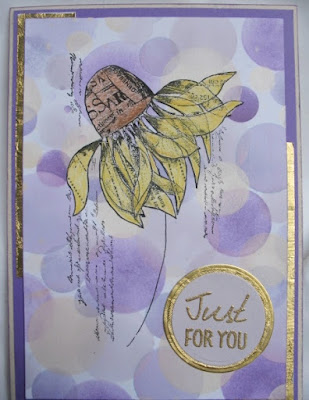
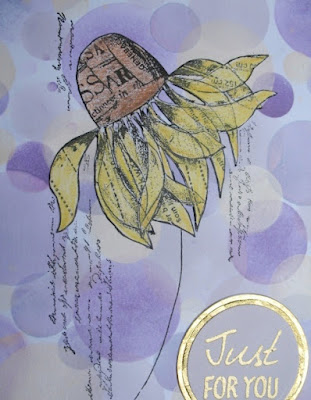
Today's card features the Gina K  Majestic Peony stamp, Stamped in Memento London Fog ink and coloured with Polychromo pencils.


I trimmed the image out, coloured the area at the rear that I did not trim, and attached it to the back of  a standard fold card that opens from the left...  I tried the technique here as taught by Jennifer McGuire - Don't know that I did it quite right, but it 'worked' 


Here it is partially opened.

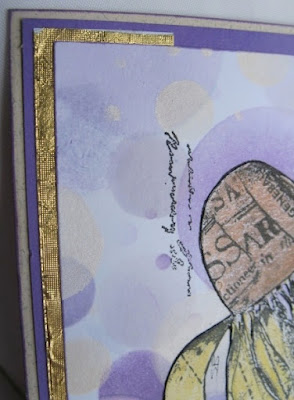
The base of the card was painted with some Cosmic Shimmer mousse in  metallic blue.  I cannot give your the exact colour as I am currently not at home... I am staying with a friend who had surgery this week.  


I embossed the sentiment in silver onto the blue, and also added some silver sequins around the focal image, some of which are on the panel, and some on the blue background


The inside is a double spread that I layered over the base for added stability - I also stamped part of the image in the grey, splitting it over the two sides.  The panels were edged with the blue, and an encouraging verse stamped in the grey on the left.

I am linking this to:


Sunday, February 20, 2022

Stacked Iris Sympathy

Welcome

I was asked to make a sympathy card for a group that I belong to after the news came through that a well respected ex-member had passed away.  It needed to be larger than my normal size so lots of folk could sign and put their own messages in.
I had got to know this lady and greatly admired her for her needlework, her strength of character, and her compassion.  She also loved irises, and grew a lot, as well as on occasion embroidered them, hence why I chose them to feature on this card. 


I found the basic image online here.  It is a wonderful resource for floral images!!

I sized it in three sizes, and also flipped one image for some more interest, coloured them with my Polychromo pencils before fussy cutting them and organising as I wanted them, repeatedly!


Before I assembled the card, I used a gold pen to do some faux stitching around the border, masked that off, and stamped  a lovely pincushion image in Versamark ink.  The sentiment is gold embossed on torn vellum,


The irises were stacked to one side of the sheet of design paper from the Recollections Rainbow Inks pad.  I trimmed it so the pattern was only on one side, and also embossed it using my very old Swiss Dots folder.   I layered some gauze under the irises, but this does not show up in the photos.


The inside has four pages for folk to sign, and I also finished them with gold faux stitching, and after attaching them, tied a narrow piece of gold ribbon around the whole card, with the bow on the outside.

I am linking this to:

(Opt, Add a Sentiment)


Friday, February 18, 2022

A Flower Against Bokeh

Welcome once again
Thank you for taking the time to visit.

In my small, New Zealand swap group we were challenged to use the bokeh technique on our cards this month - not a technique I had used before.


The inks I used for the background of the card are from the Altenew Shades of Purple pack, I used the Deep Iris, Lavender Fields and Soft Lilac, and the white is Memento Moonlight White.


The flower is from Crafty individuals and simply entitled Flower! I stamped it on the background, then on another piece of white card and coloured it using various Polychromo coloured pencils, fussy cut it and glued it over the image on the card base.
The greeting is a magazine freebie, gold embossed.


The gold layering is chocolate wrapper over card, then trimmed to fit where I wanted the pieces.
The chocolates come wrapped in gold in a wee brown 'cup'.  I was making the most of the gift :)


The inside was finished with a thin strip of gold washi

I am linking this to:
(The gold paper is really bright and blingy)


Thursday, February 17, 2022

Tulips, Rhinestones and Scripture

Welcome

It's time for another challenge over at Word Art Wednesday where we are being sponsored by the very generous Stamp Simply Clear Stamps with a wonderful prize of their product.


The beautiful scripture was crafted by Karen W and is available free, over at Word Art Wednesday


I used the Stamp Simply Get Well Tulip to feature on this card, colouring it with Faber Castell polychromo pencils, and then fussy cut before mounting over a piece of Cranberry card..


The feature panels were mounted onto a soft, buff coloured card over which was layered some pale green patterned paper from the Kaisercraft Rose Avenue pad. 
Some light green rhinestones finished the card

I finished the inside with a strip of green patterned washi tape, but forgot to photograph it! 😒

I am linking this to:


Sunday, February 13, 2022

Red and Gold Hearts

Welcome

I know this is the season for Valentine's cards, but I had a wedding anniversary that I wished to acknowledge. Albeit a day late at the time of giving this card, but that was excusable (I hope) as I had been helping the couple prepare to move house!!


It is quite a simple card, but time was against me ... I started by cutting the hearts using only part of the Simon Says Stacked Hearts die.  There was a (personal) reason for this. 


I then recut the die from  gold paper, and inserted the heart pieces into the red frames that I had already adhered to the card base


The sentiment stamp is a very old "cheap and cheerful"  one that was embossed with WOW Metallic Gold Rich embossing powder.


I finished the edges with a dotted line of red alternated with gold ink


The inside was finished with some washi tape.  

I am linking this to: 


Friday, February 11, 2022

A Rose and an Oops!

Welcome

I love the technique of a simple, drawn frame as demonstrated by Natasha Foote here.
So much so I taught it in a class last year, and then the panel sat neglected due to a smudge... 


I water coloured the rose bud this year and again it sat.... 


Then inspiration hit, and I embossed the sentiment in a matching red on an opaque parchment style paper, and cut it to a banner shape, and it hid the smudge beautifully...  


The finishing detail was a few red rhinestones


I decorated the inside with some red washi tape

I am linking this to:


Thursday, February 10, 2022

A Whale of a Tail

Welcome

I made this a while ago, and had to post it overseas.  Now I know it has arrived, I can share it.

The stamp set is a magazine freebie  that I have had for at least two years....


I decided on a 'porthole' view of the whale flukes, so after layering the torn blue paper on the base, I cut a hole.   I then cut two layers of brown using two dies one size apart and layered them on the edge of the hole in the base.
I had wanted to corrugate the blue layer, but could not find the tool needed for it... 


I stamped the flukes so that they would show through the porthole, and then put the sentiments from the same set either side of it as shown.


The flukes were painted with silver and and the water with iridescent blues. 

I am linking this to:


Wednesday, February 9, 2022

Floral Welcome

Welcome
I was recently asked to make a card for the new owners of a property.  All I knew was that the lady of the house was 'sold' on the gardens at the place they were purchasing, and the vendor wanted the card to leave for them.. 


I started with a piece of design paper from a pad I bought locally called Rainbow Inks by Recollections,
and the very old SU stamp set called Infinite Goodness.


I stamped out the images onto a scrap of white card and painted them with Twinkling H2O's, then fussy cut them out.  The flowers were slightly shaped and two were glued to the base, and the centre one popped up on a foam dot, over a small piece of gauze. 

To finish the centres i popped a wee dob of glue in the middle and then piled on some gold micro beads that I have had for ages, from back in the day when I first started this papercraft journey.


The dragon fly was also coated with Kindy Glitz on the wings.


This gives an idea of the dimension and shimmer 
The sentiment was stamped in (Catherine Pooler) Aquatani ink, I masked off the other two words on the stamp to get just the word welcome. 
The edges of the focal panel were also edged with aquatani .


I finished the inside with a strip of washi tape across the top.  

I am linking this to:


Sunday, February 6, 2022

Red and Black Thank You

Welcome.

I was recently asked to make a thank you card, and it was requested that I use red, black and white in it, with a style/image appropriate to the (male) recipient's culture.


I chose this fern style of leaf and gold embossed it on black.


The thanks I stamped and embossed in red on a snippet of white.


When making the card up, I layered two sides over gold paper, and embossed a fine line of gold on the other edges, which can be seen in the photo above.  I also added dots of gold ink at the base of the leaves to 'ground' them


On the inside I stamped the image again using two tones of green ink,  stamping off first so the image was quite faint so it could be written over.


I then stamped the fern image on the envelope, this time spritzing the stamp with water and stamping off the corner.

My customer was very happy with the finished card.

I am linking this to:


Wednesday, February 2, 2022

A Fancy Die and Ribbon

Welcome

It's time for another Challenge over at Word Art Wednesday, where our most generous sponsor this fortnight is 
Pretty Pink Posh, with a $30 gift voucher for the winner.

I don't often make smaller or square cards, but this piece of very dark green card was sitting on my desk from another project, and it fitted the die cut beautifully, so here it is ...


After printing out the scripture, which is available free over at the blog site, I die cut it using one of the S/B Majestic Elements (Square) [discontinued] 


I only added colour to the flowers and some of the leaves in the floral ends to the banner.


I then brushed some Memento Delicata Golden Glitz  ink on the edges. 


The ribbon is gold toned chiffon, that I used double on the base to give the better colour, and then tied the bow with a single layer.


I finished the inside with a strip of gold tape.  

I am linking this to: