Pages

Tuesday, January 31, 2023

Foiled Get Well

Welcome

I don't often use pre-printed images in card making, but this one appealed to me, as did the technique that was used for foiling.  
The tutorial, with the images, is on the Graphics Fairy Site here
I was really happy with the outcome, and the card went into the mail almost immediately.


The foiling was done in crimson, and went really well with the rhododendron image on the print out - there were various sentiment strips and I chose these ones for this specific card


There were stamps and butterfly images as additional ephemera also.  


All the elements were sponged with Tea Dye D.I. before using, and the butterflies were adhered on their bodies only, so their wings were free to be lifted up for added dimension.


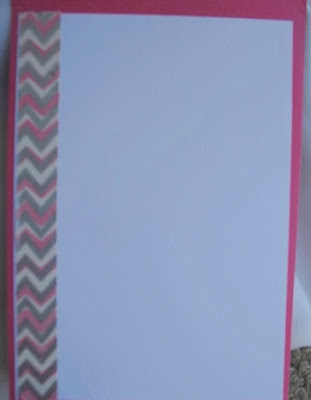
I finished the inside of the card with another strip of foiling in red. 
I love the way that the technique gives a distressed look to the end result. 

I am linking this to:
The technique was a 'first' for me


Saturday, January 28, 2023

Feathers of Gold

Welcome

I made an impulse buy this past week - thanks to a couple of cards by Jeanette.  
I love the (Gina K) feather stamp and die set she used, so wanted to buy it - probably fortunately for my budget, only the die was available locally (the stamps are on back order).


When I was looking for some black cardstock snippets to cut the feathers, I found a piece folded into a card base, and my colour scheme was determined!

When I first cut the dies, I thought I would doodle in the centres, but did not trust myself, so I chose instead to paint them in metallic gold.


I also painted some snippets of white card to form a layer for the edge of the white panel.


I stamped the sentiment and gold embossed it on another snippet, edged the black panel with another snippet of  gold painted white card,  but it still got 'lost' on the black background, so I used a gold pen to outline two edges. 
Three gold sequins finished the front panel


Some gold washi tape finished the white panel inside.

I am linking this to:
(love the drama of black, white and one colour - this time it's gold)


Wednesday, January 25, 2023

Torn Paper

Welcome

This was my January card for our card swap group here in New Zealand
The challenge was to make a card using a 'forgotten' technique, and I chose the faux torn paper technique, as it is one I love but have not used for ages.


The centre panel was blended with two shades of green ink, and the lighter colour used to add a wee border right around the focal panel


The images on the inked strip were ephemera from a New Zealand firm, Imagine If, from their 2022  calendar, where there was a page of ephemera included.  
I coated the dragonfly's wings with Wink of Stella


The sentiment was a magazine freebie , stamped in a deep red to match the flowers


Some red flat back pearls were adhered to finish the card.


I finished the inside with two strips of washi tape, layered together

I am linking this to:

These were the first images I have used from the Ephemera Sheet


Sunday, January 22, 2023

Tea, My Friend?

Welcome

I am back with another napkin card from late last year.
Again it was a napkin I had 'snaffled' when out, and I used it for a birthday card for the hostess a month or two later.


After gluing the napkin onto a piece of card, I used an embossing pen on all the gold printed areas, and then embossed with WOW Metallic Gold Sparkle embossing powder. I also wiped the edges over a Versamark embossing pad and dipped them into the same powder.  .  


I used a snippet of pink card that matched the card base to emboss the sentiment onto, using the same e.p., and popped it up on foam dots to give a wee bit of dimension.


I used some washi tape for the inside, which the recipient had given me as a birthday gift last year.


On the other side, I inked an area with pale blue ink, then glued on the wee cupid image, which had been trimmed out of the paper that the recipient had wrapped an exchange gift for me in.  


Thursday, January 19, 2023

Mid-Month Favourite Colours

Welcome

It's time for We Love Stamping mid-month inspiration in the January  Favourite Colours Challenge.

Please note there is a slight change to the rules
Can we please draw your attention to a change with regard to entries using Instagram. As this format does not offer the option to add a working link back to our challenge, in future they will not be eligible and deleted. We are doing this to be fair to the majority of entrants who do comply with this requirement.

This time I started with a fun green bubble background, and augmented it with a teal green card base
 - I love using green in my cards


This wee mermaid was a freebie I found on line


I painted her, and her wee fishy friend, in twinkling H20's


Added a split sentiment embossed in sparkle silver ep


I added a few large flat 'dew drop embellishments after taking most of the photographs, but they are in the top photo

Monday, January 16, 2023

Background Stamped With What???

Welcome

Last month in my small NZ swap group the challenge was to use what would be considered 'waste packaging' to form our backgrounds.
Twice I thought I had decided what to use, and twice I saw others had done it, as I was very late getting my card made... so I was innovative and chose to use the inside layer of some corrugated cardboard, as that was all I had - the first few minutes were spent taking the flat, outside layer off... 
 The Natasha Foote video we were given to inspire us is here 


I first brayered the blue acrylic paint on my Gelli Plate and took a print off it using corrugated card, and then repeated using gold paint - I challenged myself and put the different colours on at different angles, and did not fill the whole background...  


The tree was cut from a die that was a magazine freebie - the paper I used was almost iridescent, you can see the colour change in the right, bottom corner of the tree - I have had this paper since I first started paper crafting twenty something years ago...


The greeting was embossed in a sparkly gold ep, then I laid the stamp over the embossed layer,  drew and cut around to to make a faux 'shadow' layer.


A simple finish on the inside with floral washi tape in a matching colour

I am linking this to:
New technique, first use of the die and stamp


Thursday, January 12, 2023

Sparkly Balloons

Welcome

I needed a card for a girl turning eight, and I am not sure of her likes and interests, so I came up with a fairly neutral, but feminine and sparkly card.


The background was a 'Mop up" piece using Dusty Concorde DI.  
When I have been using ink to blend on card, as I work on a waterproof surface, I simply give the ink a light spray of water and dip the card into it until it is looking ok to me...waste not want not!
I then gave this one a light spray of Lindy's magical mica spray French Lilac Violet (New, first Use)


To add interest I randomly stamped this butterfly over it in Versamark ink, then brushed it with a pink mica powder... that I have had for years and not used... New, first use.


I punched five balloon shapes from sparkle card and wrapped variegated metallic thread around them to form ties (a very fiddly task!!)  I popped the balloons up on foam dots, and then gathered the threads together with some ribbon and tied a bow - which promptly decided it was going to end up upside down, by which time I was so frustrated I left it like that!!


The sentiment was stamped with purple ink and clear embossed


The inside was finished with the strip of the purple ribbon with a simple knot tied in it.

I am linking this to:
For the 'new' challenges - the mica powder and the spray


Sunday, January 8, 2023

Tool Time!

Welcome

And another special welcome - this time to Carol G of CreationsNZ. Do pop over and visit, her work is amazing. Thank you for choosing to follow me

This card was made for a man who loves to work with wood, and is gifted in it.


I started by making a woodgrain panel. swiping London Fog Memento ink, and Lawn Fawn Moonstone, Crunchy Leaf and River Rock inks over a scored piece of white card.
This was adhered to a piece of bottle green card


Above it I placed this piece of corrugated card that I had wiped with gold and ruby gilding waxes


The sentiment, a magazine freebie, was gold embossed on the green base.


I was not happy with the card even at this stage after adhering the small hand tools , cut from a frantic stamper set of dies.  I then remembered something I had read on a blog, and took a fine liner pen, the finest I own at 0.01 mm, and formed a 'shadow' to the right of each tool - the photo above shows the difference it made!


I finished the inside with some bronze dotted washi tape.

I am linking this to:
The old is the tool set, and new is the technique of shadowing the die cut
Wood Work is a hobby, rather than primary employment for the recipient


Wednesday, January 4, 2023

Birdie Birthday

Welcome

And a very special welcome to some new followers
Beccy Muir - Beccy's Place
Re Gina - I couldn't find a link for her
Linby of Crafty Linby
Cathy of KraftyKoolKat
These ladies make some amazing art - do follow the links and pay them a visit

Onto today's card - a simple pair of die cuts on, would you believe it, another napkin base!


The bird, an older Inspire S/B In Flight die, was cut out of metallic paper


The greeting was also an older S/B die, cut twice in card and once in the metallic paper

These were mounted over the napkin background, and three pink sequins were the finishing touch.